Exporting orthophotos to AutoCAD
When exporting orthophotos, 3 types of formats are available.
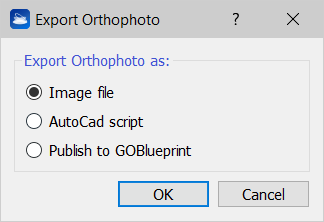
1. Image file
The orthophoto, as it is displayed, is exported in a picture format [.bmp, .jpg, .jpeg, .png, .tif, .tiff], keeping the same size [pixels] and resolution [pixels/unit of measure] of the original orthophoto.
2. AutoCAD Script
Several options are available to export your orthophoto to AutoCAD, in the settings dialog.
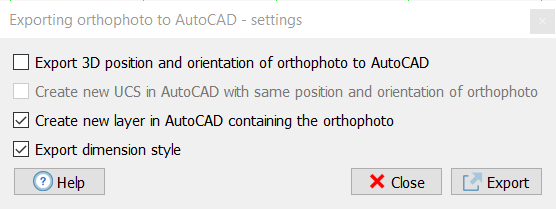
Export 3D position and orientation of orthophoto to AutoCAD: to choose whether you want to export to AutoCAD the plain 2D image, or whether also the 3D position and orientation that the image has in Reconstructor®'s current UCS should be exported to AutoCAD. Exporting the image's 3D pose to AutoCAD is useful if other items (e.g. polylines) related to the same model are exported to AutoCAD.
If you selected to export the 3D position and orientation as well, then the second checkbox is enabled.
Create new UCS in AutoCAD with same position and orientation of orthophoto: to choose whether you also want to create in AutoCAD a new UCS with the same position and orientation of the image, or not. If you selected to export the 3D position and orientation as well, then this checkbox is enabled.
Create new layer in AutoCAD containing the orthophoto: to choose whether to export the orthophoto in a new AutoCAD layer or in the current layer. Depending on the number of layers in the AutoCAD project, you may want to add a new layer or not.
Export dimension style: to give choice about whether to export also the dimension style (AutoCAD compatible) or not.
![]() Check this option only for the first import in AutoCAD.
Check this option only for the first import in AutoCAD.
Please, note that the dimensions are saved in a separated dimension style in AutoCAD called Reconstructor.
![]() If two first options are flagged, at the end of the import process in AutoCAD the view is focused on the origin of local orthophoto's UCS, to fastly localize the orthophoto.
If two first options are flagged, at the end of the import process in AutoCAD the view is focused on the origin of local orthophoto's UCS, to fastly localize the orthophoto.
To visualize a georeferenced orthophoto in the correct global reference system (according to global coordinates), set the World UCS in AutoCAD.
Click on Export button to automatically save an image (*.png format) within together a script file (.scr).
|
|
Suggested steps for orthophoto export to AutoCAD
If you need to reset the orthophoto, you have to "Detach" it, save the AutoCAD project and drag&drop the script file another time. |
|
|
To set a transparent background set the alpha channel to 0 (zero) in Orthophoto Viewer Settings' Background color options. |