Bundle Adjustment
Solving a puzzle of a thousand pieces
To understand bundle adjustment, we can imagine to solve a big puzzle with many pieces. Each piece matches with four others, sometimes the match is easy, sometimes you have to slightly push a piece inside another, and sometimes two pieces just don't match. Often, you need to know the neighboring pieces to decide whether two pieces match correctly or not. And the pieces reach their final, adjusted positions only when the puzzle is complete. If ICP registration can be seen as finding the match between two pieces, Bundle Adjustment means completing the whole puzzle by choosing and refining the good ICPs and discarding the wrong ones.
This algorithm allows to register together many point clouds, distributing evenly the registration error. The user specifies which point clouds are reference clouds (they are locked during the registration) and which are moving; the moving clouds will move and align on the reference clouds and between them during alignment. While the ICP registration works only for one pair of clouds at a time, this algorithm registers together N clouds at the same time, diffusing and minimizing the global registration error. The input point clouds must be pre-registered. They do not need to be structured but they need to have the normals. There is no upper limit to the number of the input clouds.
How does it work
Given a set of N scans, the algorithm will create as many connections among pairs of neighboring scans as possible. For each connection, a pairwise ICP will be executed, using the Settings accessible from the Line Up top toolbar. From each ICP, the best matching point pairs between the two scans will be saved. In the end, a final nonlinear minimization step will be run only among these matching point pairs of all the connections. The global registration error among these point pairs is minimized, having as unknown variables the scans'poses.
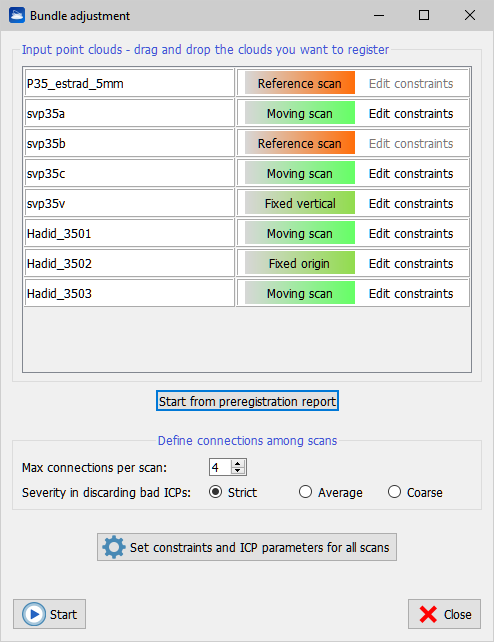
Input point clouds
Just drag the poing clouds you want to finely register from the project view, and drop them on the Bundle Adjustment dialog. They will appear in the top list. On the right of each cloud, a button appears that can be toggled among red (reference scan) and green (moving scan). Therefore here you can decide which scans must remain still during registration and which must be registered.
Preregistration report
If you have previously performed the automatic preregistration of your scans, you can use the results of your preregistration in the bundle adjustment. Click Start from preregistration report and load the report of the automatic preregistration, a text file by default saved in the /Exports folder of your project. The dialog will show in the top list all the clouds that were automatically preregistered, and will adjust the ICP settings accordingly to the preregistration error contained in the report.
Defining connections among scans
To reach the best global registration possible, this algorithm will use as many connections as possible among your scans. Knowing the topology of your scans, you can set the Max connections per scan parameter accordingly. If you scanned the exterior of a building, then it may be that each scan shares geometry with 3 or 4 neighbors. If, instead, you scanned a room or a hall, then it makes sense to say that each scan matches with other 5 or 6 scans, therefore all pairwise ICPs between a given scan and its 5 or 6 neighbors should be launched. However, doing so there is the risk to run ICP between two scans that have no geometry in common. In this case, the ICP error will be very high.Therefore, the algorithm will discard bad ICPs and keep the good ones. You can set the Severity in discarding bad ICPs among three levels as in the dialog. We advice to always select “Strict”, and only if your data are particularly noisy (e.g. mining data) then select “Coarse”.
Global constraints
You can specify some constraints that must remain valid for all the scans during all the registration. Below in the dialog, you can flag that all scans have fixed vertical . This is useful for example if you have imported scans from a scanner with vertical corrector and you trust the vertical to be correct below 1°. You can also flag that all scans have fixed origin. This means that you know already the coordinates of all the scans'origin with a precision higher than the point density (~ expected registration error), therefore the scans will only be allowed to rotate during bundle adjustment.
Scan-specific constraints
The top of the window shows the list of scans to be registered. On the right of each scan, a button allows you to switch between whether the scan should be reference or moving.
|
|
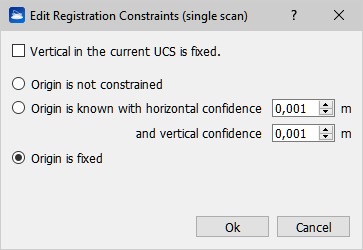
When the scan is moving, still you can define scan-specific constraints via the Edit constraints button. Clicking this button, a dialog appears where you can flag whether the scan has the vertical fixed or not. Moreover, you can constrain the scan's origin in three levels. The origin can be free to move (not constrained), can be constrained within a certain horizontal and vertical interval, and can be held fixed. |
Output
Once you have defined the connections among the scans and the additional constraints, press Start to begin processing. A progress bar appears, and you can also open the log window to have more detail on what's happening.
At the end, the clouds will be moved to the new positions and their files will be saved. Therefore, you may want to save the clouds' poses before running bundle adjustment. Moreover, a dialog appears indicating the number of registered clouds and the global registration error. After you press OK, you can click on Save PDF report to get a much more detailed PDF report. There also a Save .txt report option to save a text version of the full report that can be copied to Word or Excel.
Resolution of common problems
I have run bundle adjustment, but scan A didn't match well with scan B
Get the report of the bundle adjustment, and check if the edge between A and B ( or B and A) is listed in the section “Report by edge, sorted by error”. If it is, most likely the ICP between A and B has converged bad: you can re-run the ICP only between A and B with different parameters, and then re-launch the bundle adjustment having A and B among the references.
However, most likely the edge between A and B will be in the “Edges not used” section of the report, or even not in the report at all. If the edge (A, B) is among the not used, then try to re-launch the bundle adjustment decreasing Severity in discarding bad ICPs. If the edge (A, B) is not in the report, then try to increse the Max connections per scan and re-launch the bundle adjustment.
I have run bundle adjustment, but I see that the scans did not converge well, moreover the global registration error is 4 cm while it should go down to 2 cm.
Press the Settings button of the Line Up top toolbar, and go to the ICP settings. Set the ICP parameters so that only the very best inliers are selected. You can lower the min search distance to 0,2 m or to 0,1 m, lower the sufficient control points to 3000, and lower the max divergence among normals to 10° or even down to 3°. Then, re-launch the bundle adjustment. Only the best matching points among scans will be selected, and the error among them will be minimized, resulting in a better convergence and tighter error. You can repeat the process to improve the results.