Camera Calibration on a model
|
|
The objective of camera calibration is the registration of photos (perspective or spherical images) with the 3D data. This process creates photo-realistic texture maps for the 3D model. |

When you access the command a Camera calibration dialog will appear:
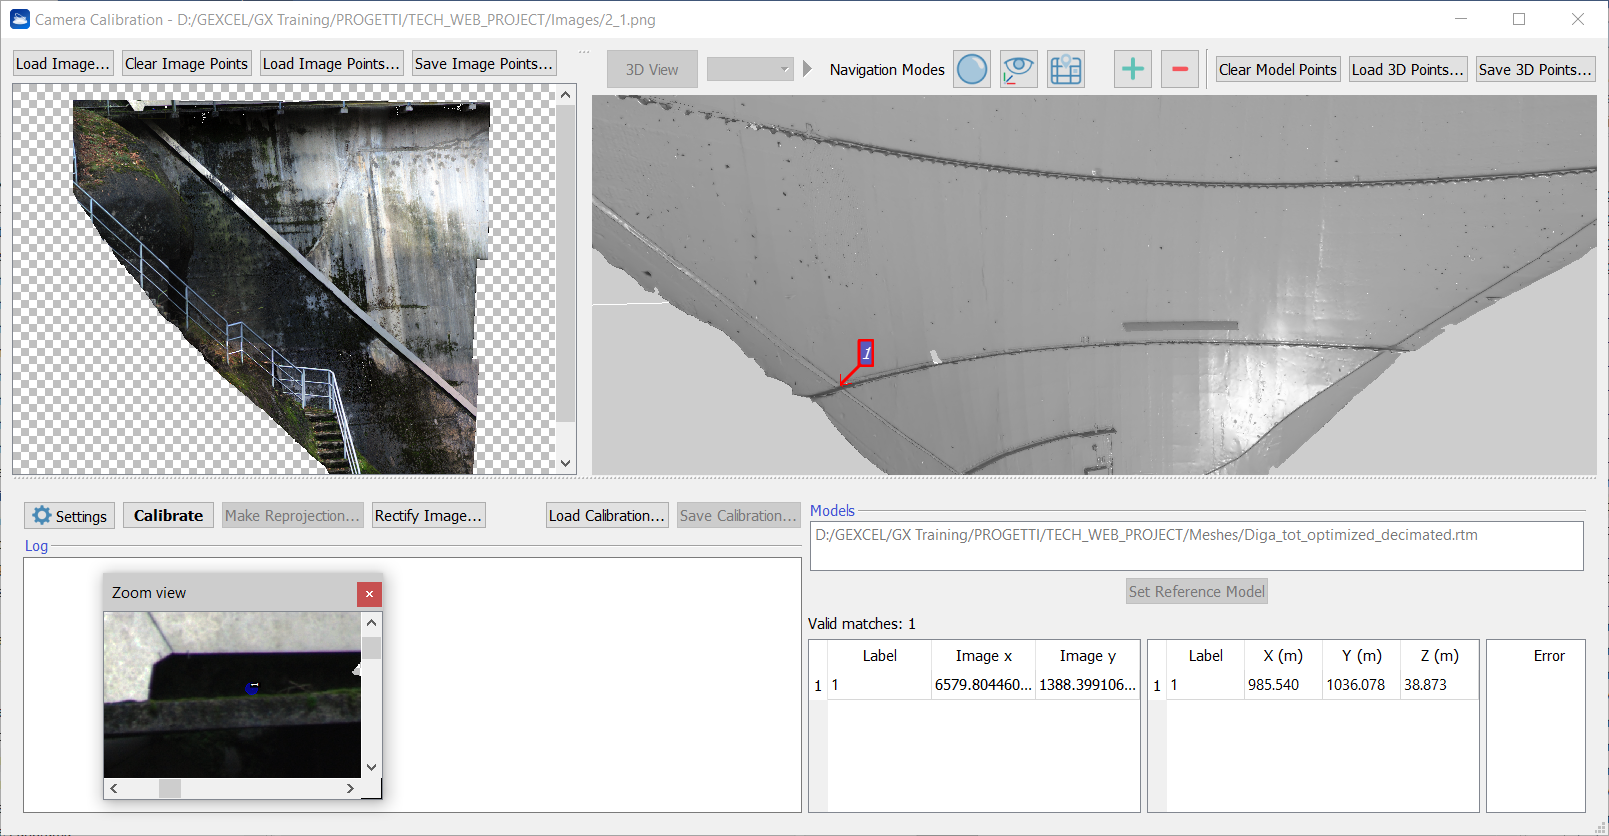
Load a photo to calibrate with Load image, and at least a grid point cloud with Load 3D grid. If necessary, change the reference grid from the loaded ones, the image-grid point pairs are stored for each grid, and are accumulated.
A resizable zoom window appears for both where an independent zoom factor (Alt-mouse wheel) can be set from the main window, just center the zoom area by moving the mouse on the main window while pressing [Ctrl] key. To place a marker, double click the left mouse button (LMB) either on the main window or in the zoom window. To move a marker, click on it with the LMB and keep it pressed while dragging the marker. To remove the marker, right click the mouse (RMB) on the marker.
In general, to interact with the images:
- Zoom in/out: mouse wheel
- Fit the image in the window: Alt + Middle Mouse Button (MMB)
- Reset to original size: Alt + Right Mouse Button (RMB)
- Translate the image: Shift + LMB drag
- Space bar: rotate image 90 degrees
- Show/hide zoom window: Z key
- Move zoom region inside global view: [Ctrl + LMB]
The list of points is shown in the table, where every cell is manually editable to force the values. It is possible to import a list of points from a file by pressing Load points.
For the photo, the format must be
Image_x1 Image_y1 <Point1 Name>
Image_x2 Image_y2 <Point2 Name>
...
For the grid the format must be
X1 Y1 Z1 Image_x1 Image_y1 <Point1 Name>
X2 Y2 Z2 Image_x2 Image_y2 <Point2 Name>
...
Try to change the color type of the grid on top of the window to improve the contrast of features. Press the right arrow to show a menu of available commands for the current color type for better adjustment.
Choose the right calibration Algorithm, depending on your kind of photos:
- Perspective for perspective images
- Spherical Camera for spherical images
- Fisheye for photo acquired by fisheye lens
After at least 11 marker pairs (for perspective images and at least 4 for spherical images) are found between the photo and the grid, press Calibrate. The result is shown in the Log panel with the computed field of view of the photo and relative re-projection error. If successful, the calibration and the point pairs can be saved to file by pressing Save calibration. A .cal file is created, in XML format, storing the calibration using calibration parameters. As a test of the calibration, press Make Reprojection, to save an image of the photo re-projected on the grid.
Point Guessing System
When you select at least 11 correspondences for perspective images (and 4 correspondences for spherical images), the point guessing system (PGS) will perform a background calibration and will automatically try to estimate the position on the image of additional points that you place on the grid.
The procedure is the following:
- Select a point on the grid (right image).
- The PGS will place the guessed point on the image (on the left). The zoom box will center on the newly placed point.
- You have to correct the position of the placed point if necessary.
- If the PGS cannot place the point you have to place it manually.
Note: You can also select a point on the image and the PGS will try to place its correspondent on the grid, but this procedure is not recommended since it is slower and less accurate.
Camera Calibration Settings
By clicking on Settings, a dialog including all the camera model/calibration settings and RANSAC parameters is opened:
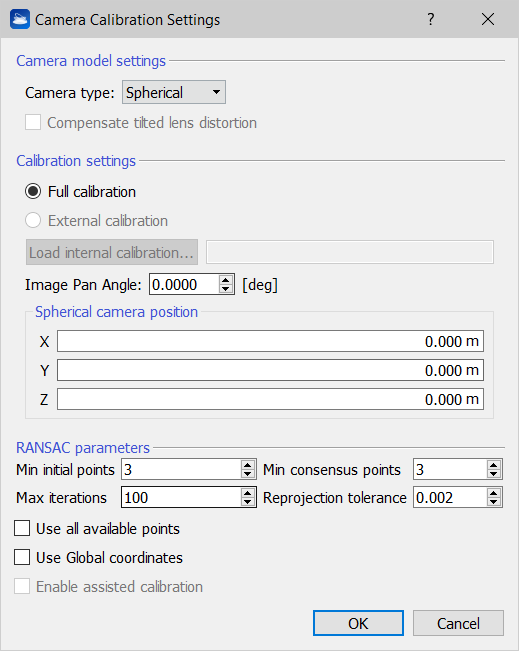
Camera model settings
Here you can select the kind of camera used to take pictures: Perspective, Spherical or Fisheye. For Perspective and Fisheye cameras it is possible compensate the tilted lens distortion by flagging the relative item.
Calibration settings
Here it is possible to choose if running a Full calibration or only an External calibration, loading the .cal file of an Internal calibration already done.
If the image is rotate respect to the reference axis of the point cloud with a known value, you can set it in the Image Pan angle [deg] parameter. In the same way, if the relative position between the center of the point cloud and the center of a spherical camera is known, you can fill the X, Y, Z components of the rototranslation in the Spherical camera position cells.
RANSAC parameters
The RANSAC algorithm selects randomly the minimum number of points required to determine the model parameters (in this case the camera calibration), solving for the parameters of the model. Then determines how many points from the set of all points fit with a predefined Reprojection tolerance. If the fraction of the number of points over the total number points in the set exceeds a predefined threshold, re-estimates the model parameters using all the identified inliers and terminates. Otherwise, repeat the previous steps for Max iteration times.
See also the Point clouds coloring and textured meshes videotutorial.