Send to Heron Desktop
|
|
To import reference/static point clouds into Heron® Desktop it's mandatory import before the clouds into the Reconstructor® project. As general rule, remember to create the Reconstructor® project directly linked to the Heron® Desktop project. That is especially the case with the Send to Heron Desktop command: the directly connection between two environments is facilitated if the Reconstructor® project is created from the relative Heron® Desktop project. |
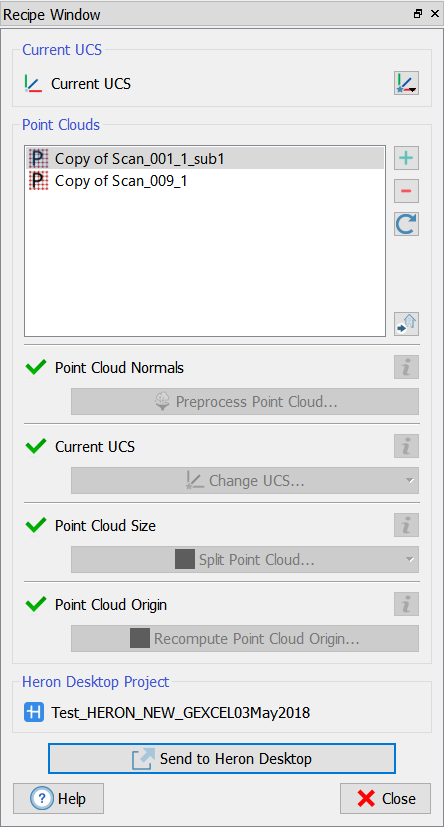
When you select the Send to Heron Desktop button a recipe window allow you to choose the point clouds to export (by dragging&dropping them from the Project Window or by clicking the + button) and verify if they are ready to be exported.
If you are trying to export one or more point clouds that are already exported to the Heron® Desktop project, three options are here proposed:
- Duplicate Cloud: to create a duplicate of the selected point cloud in the project and export it to Heron® Desktop
- Unlink Previous Export: To unlink the already exported point cloud in the Heron® Desktop project and add the new one.
 If you unlink a cloud from a previous export, you will no longer be able to import it as part of any Global Optimizations it was already used into.
 - Skip: To skip the export process for just this cloud.
|
|
To set a global and common UCS (User Coordinate System) for all the exported point clouds. |
Three ways are available to set the desired UCS.
Automatically generate UCS: To create a new UCS from the point cloud's pose.
Choose existing UCS: To select an existing UCS from the Project Window (Survey Tools\User coordinates systems)
Open UCS Creator/Editor: To open the command UCS Creator/Editor, able to create or edit an UCS starting from other UCS, item's pose, face orientation and points.
The Current UCS in the Project Window will be automatically changed, according to your choice.
![]() Modifying the UCS for a single cloud, a former choice is overwritten. On the other hand, if you are managing point clouds with different and incompatible UCS you should be able to set a correct UCS for every cloud. If it is not possible to have a common UCS for all clouds, you have to define which clouds must be unselected or repositioned in Reconstructor®.
Modifying the UCS for a single cloud, a former choice is overwritten. On the other hand, if you are managing point clouds with different and incompatible UCS you should be able to set a correct UCS for every cloud. If it is not possible to have a common UCS for all clouds, you have to define which clouds must be unselected or repositioned in Reconstructor®.
If there is a problem with a cloud, it is red in the list. If you select it you can easily see its issues in the check list.
![]() Pay attention to the set Current UCS, in order not to export point clouds from different UCS in the same Heron® project.
Pay attention to the set Current UCS, in order not to export point clouds from different UCS in the same Heron® project.
See also Current UCS in the next paragraph.
Point Clouds
The point clouds must overcome four checks to be exported:
- Point Cloud Normals
Heron® Desktop may be unable to perform a Global Optimization with a cloud that doesn't contain the correct normals directions. Before exporting, it's therefore recommended to preprocess the point cloud to compute the directions of its normals.
So, if the normals are not already computed or there is some discontinuities in their distribution, (re)compute them by using the (Point filtering & Clustering >) Preprocess Point Cloud command, check Compute Normals and select Determined automatically or Keep preexisting verses but make them consistent.
The computation will add an "Inclination" layer to the current point cloud.
Sometimes can happen that the normals' sense is not toward the center of the scan/point cloud, but inverted (as for example for unstructured point clouds or mesh models converted into point clouds).
To avoid this issue, open Screen Settings > Options from the Top toolbar and check Show normals rendering enabled to visualize the normals' vectors and understand if the normal's sense is correct or not.
If it is not correct, invert the sense of the normals by using the Point filtering & Clustering > Invert normals command.
Heron® Desktop does not operate with georeferenced large coordinates, but it requires local coordinates. Large coordinates may cause visualization errors and will negatively affect the output of the Global Optimization.
Before exporting, it's therefore recommended to select or create a different local UCS.
For optimal results, an UCS with its origin near the exported point clouds should be used.
Alternatively, if the position of the clouds to be exported is not relevant, it's possible to disregard this warning, and export them in local coordinates, centered on the origin.
By clicking the Change UCS button the center of the point cloud's bounding box will be automatically chosen as origin of the new UCS.
![]() The same UCS must be set again when the results of a Global Optimization are imported back, in order to preserve the reference system.
The same UCS must be set again when the results of a Global Optimization are imported back, in order to preserve the reference system.
See also Current UCS in the former paragraph.
- Point Cloud Size
Heron® Desktop is optimized to work with small or medium sized point clouds. Very large point clouds will take a long time to process, use many system resources, and may be incorrectly processed during a Global Optimization.
Before exporting, it's so recommended to split a very large point cloud in smaller sections.
The point cloud splitting tool will not modify the exiting point cloud, but will create a set of smaller slices, with the desired size, and aligned with the current UCS.
By clicking the Split Point Cloud button two modalities are available to split the large point clouds:
Slice along a grid: To create new clouds by splitting the source along the split lines. The source cloud will not be edited. Configure the parameters to define how to split the area covered by the point cloud (map view).
![]() The offset value cannot be higher than half dimension of the block.
The offset value cannot be higher than half dimension of the block.
Manually Extract Subset: To select parts of the point cloud to extract. The extracted points will be copied to a new point cloud. The process can be repeated multiples times to create multiple point clouds.
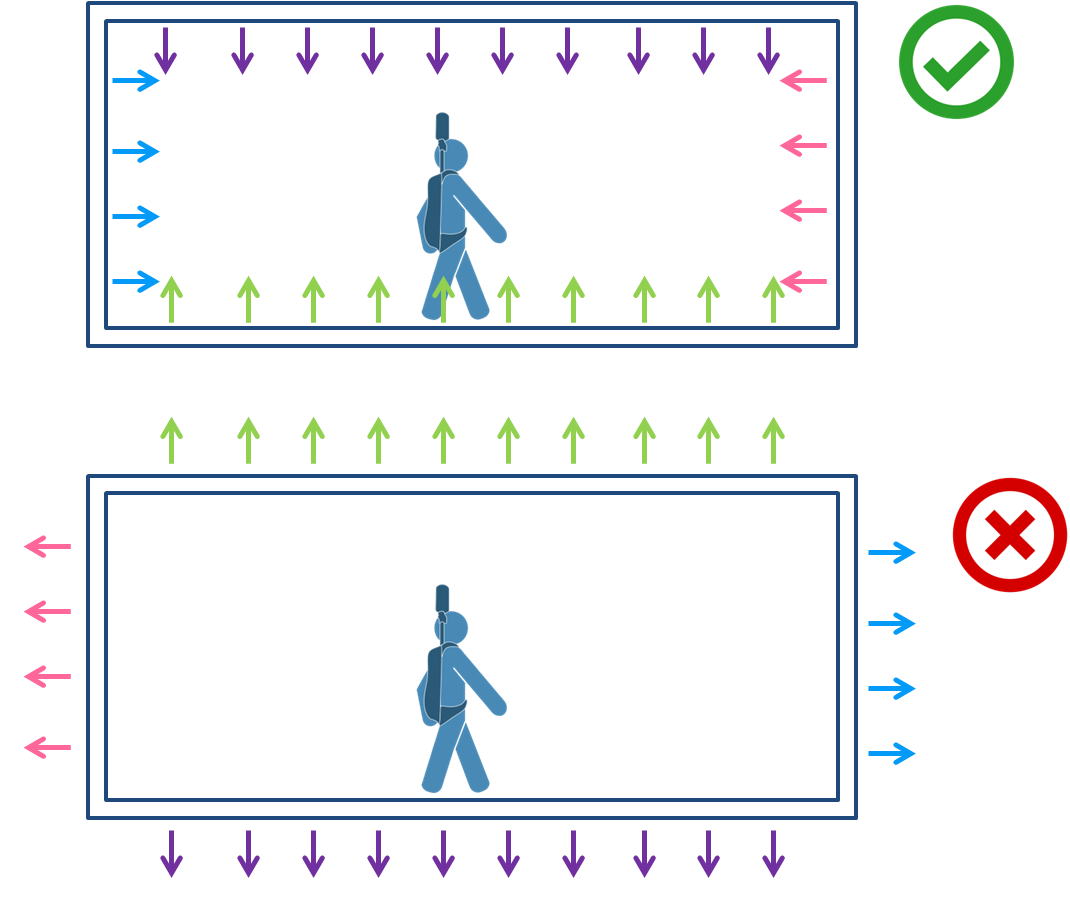
- Point Cloud Origin
The origin of an unstructured point cloud (also that of Heron®) could lie near or outside the edges of its bounding box.
Heron® Desktop is optimized to work with clouds whose origin centered on their bounding box or nearby. Using a cloud with an origin that lies outside or near the edges may cause the camera controls and the Global Optimization process to behave erratically.
Before exporting, it's therefore recommended to relocate the cloud origin to the center of its bounding box, near the ground level.
After clicking on the Recompute Point Cloud Origin button, manually select or write coordinates of the new origin and choose the approximate ground altitude.
Then click on Recompute Origin.
The relocation process will reposition the point cloud's origin to the center of its bounding box, and recalculate the coordinates of each point accordingly. The location of the points in the space will not change, and any geo-referencing or existing registration of the cloud will not be affected.
Note that at the end of the process, the point cloud data will be saved automatically.
At the end of the configuration, click on Send to Heron Desktop.
The scans will be automatically imported and listed in Heron® Desktop > Mapper > Resources > Static Clouds.
![]() Close the Heron® Desktop Mapper environment before to export data.
Close the Heron® Desktop Mapper environment before to export data.
Tips
|
|
Remember to clean the point cloud from noise due, for example, to reflecting surfaces in the interior so as to facilitate subsequent alignment in Heron Desktop. |
|
|
Below are explained the suggested workflow to follow, depending on the type of the point clouds you want to export: 1. Structured/gridded point clouds (as for example static laser scan acquisitions) 2. GEOREFERENCED (in large coordinates) structured/gridded point clouds (as for example static laser scan acquisitions) 3. Unstructured point clouds Generally, it's firstly suggested to check the normals direction and distribution on the point clouds. If the clouds are very large, split them into smaller clouds by using the dedicated Point Cloud Size tool. If the origins of the clouds are far from their centers and they are georeferenced in large coordinates, shift them and correctly set an UCS. |