Create/Edit Heron Survey
|
|
To Edit and Create (a new) Heron® Survey, after importing the Heron® data. |

Click on the above icon to create a new and empty Heron® Survey, or drag and drop here (from the Project Window) an already created Heron® Survey.
A Heron® Survey is a particular items group inside Reconstructor®, that includes all the elements imported from the Global Optimization, with the addition of the blueprint layers.
In the upper part of the dialog, the editing functions are achievable in the following order:
- Create a New Heron® Survey
- GoTo the origin of the Heron® Survey, to visualize it in the 3D view
- Color ID and name of the Heron® Survey, that you can rename by clicking
 .
.
Survey Origin
It is defined as an User Coordinate System, generally located in the origin of the imported point cloud (according to the current UCS).
It can be changed by clicking the ... button on the right, to select an UCS already present in the project that will be the new Survey Origin.
![]() Changing the Survey Origin you may alter the settings of the layers included in the survey, resetting the associated blueprints. A warning message will appear to remember you to pay attention on it.
Changing the Survey Origin you may alter the settings of the layers included in the survey, resetting the associated blueprints. A warning message will appear to remember you to pay attention on it.
Survey Items
By selecting the several Survey items, dedicated Properties and Actions will be available.
All the items are hierarchically organised: e.g. a Heron® point cloud includes a trajectory which in turn includes the cameras.
In any moments you can add a new point cloud to the Heron® Survey, by clicking the ![]() Add point cloud button.
Add point cloud button.
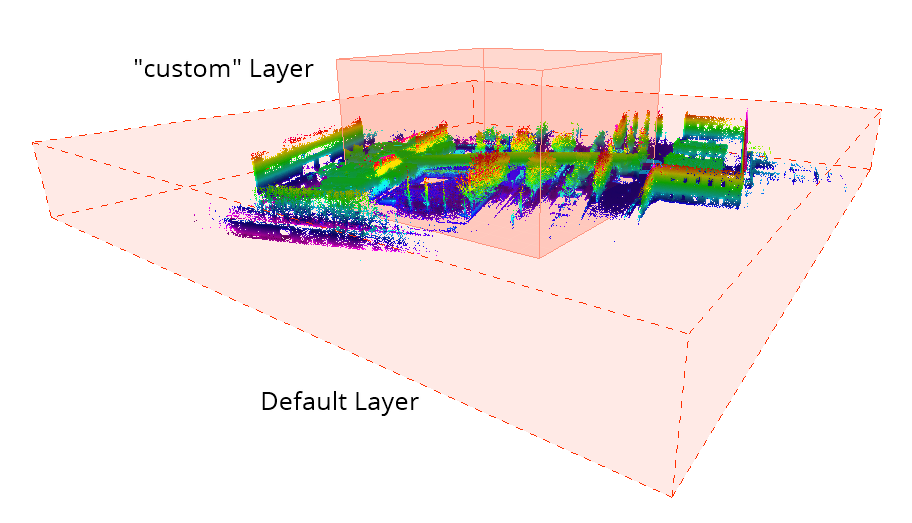
Blueprints Layers
A blueprint is a particular nadir x-ray orthophoto, specifically created for Heron® surveys. It can enhance important features of a 3D point cloud such as edges, corners, walls... It emphasize points aligned in one direction of view.
All the points of the clouds included in the current Heron® Survey, delimited by a bounding box (defined by a Layer) will be projected on the top ceiling 2D plane that will define the final x-ray orthophoto position.

A Default Layer is automatically created covering all the point clouds extensions.
Customized layers can be added/edited by the user, by using the ![]() New Layer /
New Layer / ![]() Edit Layer commands.
Edit Layer commands.
A layer is depicted by the icon ![]() , that will be converted in
, that will be converted in ![]() when a blueprint is extracted from it.
when a blueprint is extracted from it.
Other features concerning blueprints are available in the dialog:
|
|
Remove layer To remove an already created layer. |
|
|
Automatic blueprint generation To automatically generate a blueprint from the current layer |
|
|
Manual blueprint generation To generate a blueprint from the current layer by choosing the resolution (in px/m) and the contrast enhancement algorithm.
|
|
|
Blueprint navigator To open the blueprint in the Blueprint Navigator. |
|
|
Export blueprint as X-Ray orthophoto To export the blueprint as a x-ray orthophoto. |
|
|
Open in orthophoto editor To open the blueprint in the x-ray Orthophoto Editor, to modify the layer's geometry and the process in order to extract a generic x-ray orthophoto. |
|
|
Delete blueprint To delete the blueprint from the project. |


![]() The generated blueprint layer is parallel to the XY plane of the current UCS (at the time of the layer generation).
The generated blueprint layer is parallel to the XY plane of the current UCS (at the time of the layer generation).
![]() Different Layers and blueprints can be chosen and displayed in the Blueprint Navigator.
Different Layers and blueprints can be chosen and displayed in the Blueprint Navigator.
The properties available for these items are the Layer Name, the Blueprint resolution, and the Blueprint size.
Point Clouds
All the Heron® acquisition and external point clouds (*) are here listed, as well as the relative trajectories and camera information.
(*) If the Constraints add-on is licensed, also external point clouds can be included in the Global Optimization and imported in the Heron® Survey.
By selecting the point clouds two removal options are available:
|
|
Remove point cloud from survey To remove the selected point cloud from the Survey, but not from the project. |
|
|
Delete point cloud To remove the selected point cloud from the project. This procedure is more preferable than the Remove option in the project window. |


By selecting the trajectories two options are available:
|
|
Trajectories The properties available for these items are the trajectory's Name, theLenght, the Start time and the Duration of the acquisition. |

By selecting a trajectory two options are available:
|
|
Delete trajectory To delete the trajectory from the project. |
|
|
Duplicate as flythrough To duplicate the Heron® Survey as a flythrough in the Reconstructor® project. |


|
|
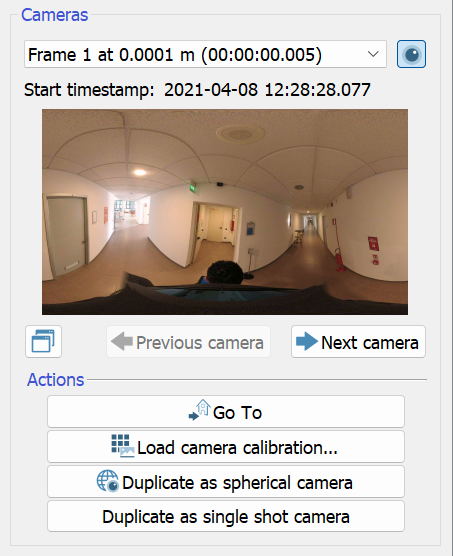
Cameras Two types of cameras are available for HERON data: streaming camera for continuous acquisitions and single-shots cameras for high resolution pictures. |
|
|
|
|
By selecting a streaming camera element (connected to the relative trajectory) it is possible to:
|
|
|
|
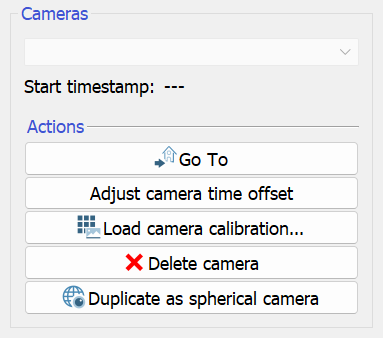
By selecting a single-shot camera element (linked to its trajectory) it is possible to:
|

![]() In the Project window, in addition to these items are the Annotations and the Targets elements.
In the Project window, in addition to these items are the Annotations and the Targets elements.